Introduction
The following instructions are intended for beginner nurses caring for patients who use tracheostomy tubes for ventilation purposes. The instructions will allow the reader to perform a routine task in a tracheostomy maintenance procedure designed to minimize infection risks and reduce the chances of granulation tissue formation.
The skill level necessary to perform the task is moderate, requiring some basic experience working with medical devices and patient treatment. The tracheostomy tube change could be performed by nurses trained in tracheostomy, ICU nurses, and respiratory therapists. There are 16 steps in the procedure that takes from 20 to 30 minutes. The task should be performed in clean conditions, with the patient positioned flat on the bed with no obstructions for the practitioner.

List of Materials and Equipment
- Tracheostomy tube sets, one in the same size and one in a smaller size;
- 10 ml syringe used for suction;
- Sodium chloride for cleaning purposes;
- Sterile gloves and lubricant for tube insertion;
- Sterile gauze and dressing set in case of bleeding.
List of Steps
- Perform necessary preparation measures: place the equipment beside the patients’ bedside on a clean surface, position the patient to lay flat. Inspect the equipment.
- Wash your hands and put on gloves.
- Prepare equipment for suctioning.
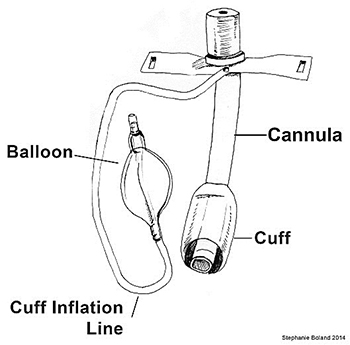
- If the tracheostomy tube has an inflated cuff, examine it by inflating air to the balloon with a syringe and deflating it.
- Apply lubricant on the new tube.
- Remove the old dressing.
- With two fingers holding the skin, remove the old tube in semi-circular movement, resembling the curve of the cannula (Ng et al., 2021).

- Inspect the stoma for any visual signs of infection, wounds, or granulation.
- Clean the area with gauze.
- Place the tube in the dominant hand with the tube facing down.
- Insert the tube in a semi-circular motion.
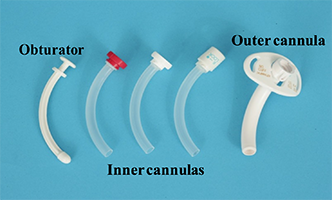
- As soon as you insert the tube, remove the obturator while securing the tube.
- Replace the obturator with cannula.
- Check the placement by the feeling of the patient’s exhaled air.
- Apply gauze and dressing around the tube.
- Secure the tube with fastener ties.
References
Ng, J., Hamrang-Yousefi, S., & Agarwal, A. (2021). Tracheostomy tube change. StatPearls Publishing.
University of Rochester Medical Center. (n.d.) Parts of a tracheostomy [Figure]. Web.
University of Iowa Hospitals & Clinics. (2018). Tracheostomy home care [Figure]. Web.